SUBSTRATE PREPARATION
The wall for wallpapering should be prepared as for painting, i.e. smooth, dry, clean and equally absorbent on the entire surface. The substrate must be firmly bound, dry, cleaned of old, flaking paint coatings, even, without cracks, free of dust and greasy stains. Surfaces previously painted with paints, poorly bonded must be thoroughly cleaned until the proper substrate is exposed and prepared. The substrate should be putty, preferably with gray gypsum or hard putties (e.g. Zolpan - Cild Pate mass). The wall should be primed with a colorless deep penetrating primer and preferably not painted. Photo wallpapers can be easily applied to the substrate prepared in this way.
TOOLS NEEDED
- a roller with a pile of 15-20 mm for spreading glue and a plastic bucket,
- wallpaper glue (we recommend ready-to-use WALLFIX DECOR or PROFIMEX CONTRACT glue), roller for pressing wallpapers on the connection of panels, (e.g. rubber)
- ANZA float for pressing and smoothing the surface of the wallpaper,
- masking tape,
- knife for cutting wallpaper,
- aluminum ruler.
The following may also be useful: protective paint foil, measuring tape, spirit level, ladder, sponge or cloth to remove traces of fresh glue.
WALLPAPER CONTROL
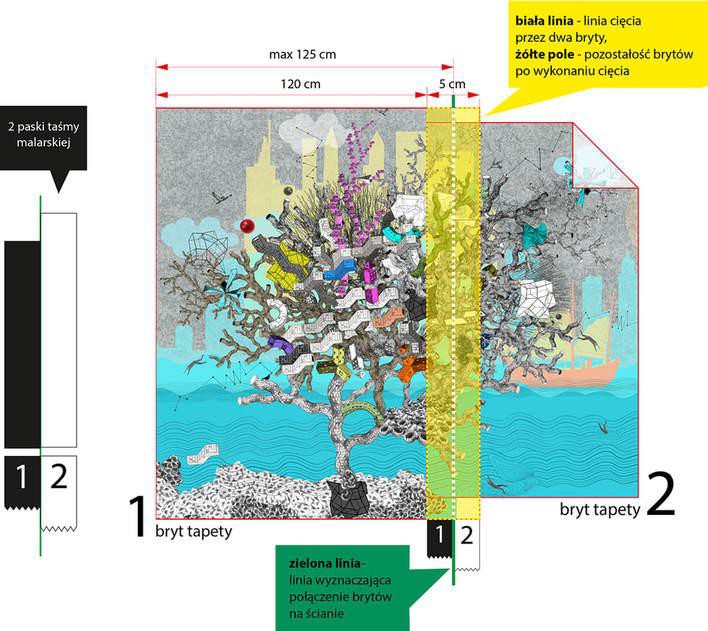
Wall murals are printed with an overlap of 3-5 cm (the next strips are not set to meet each other, but so that they overlap to form a uniform graphic), which minimizes the visual connections. Attention! Wallpapers can be cut to size (i.e. butt joint) only at the express request of the customer. Only wallpapers installed with an overlap make it possible to minimize the joints as much as possible. Therefore, the contractor should have the appropriate qualifications to install this type of veneer, as well as read the above installation instructions.
GLUING THE WALLPAPER
1. Protect the floor with a protective painting film. Use a spirit level to mark a vertical line on the wall in the place where you start gluing the photo wallpaper.
2. In the place of the intended overlap, stick 2 strips of masking tape vertically one next to the other.
3. Using a roller (pile length 15-20 mm), apply an evenly thin layer of adhesive to the wall wallpapers without dirtying tape No. 2 (using left-to-right assembly).
4. Remove strip of painter's tape #1.
5. Apply the wallpaper to the wall, align it with the marked line and gently press it in several places.
6. Check if the wallpaper sheet is applied evenly vertically and horizontally. If it's not, you can gently handle it peel off and make appropriate adjustments.
7. Press the panel with the ANZA trowel (do not do it with your hand or a rag - you can damage the surface of the wallpaper).
8. Smear the remaining part of the wall without soiling the glued sheet of wallpaper, remove the painting tape no. 2.
9. Put the second sheet overlapping so that the graphic creates a compositional whole, press the wallpaper with the ANZA trowel.
10. Press the overlaps of the wallpaper to the wall so that they form a uniform graphic, and then cut it.
11. Smear the wall under the joint and gently glue both parts with an ANZA trowel from bottom to top on the joint the principle of a zipper so that the connection becomes invisible.
12. The last phase is washing the edges of the photo wallpaper and the wall of glue residues with cloths slightly damp. Wash by stippling. Avoid rubbing the print as it can be damaged.
Before gluing, the wall should be primed with e.g. "unigrunt"